Powder coat your engine plugs
Posted: Fri May 11, 2012 2:07 pm
Hey Everyone
Figured I would try and give back to the community with a little powder coating tutorial. So my engine plugs were a bit messed up and ugly stock So I though I would do a run down of how easy and inexpensive powder coating can be and the results you can get. You don't need any expensive tools and the process is pretty simple.
Tool List
- Allen wrench to remove plugs
- Metal Polishing Kit (for aluminium)
- Drill or rotary tool to power a polishing kit wheel
- Powder coater( I use a craftsmen kit I got for like 30 bucks + ship on ebay)
- IR temp gun
- toaster oven (one your not gonna be using for cooking anymore)
- Sandpaper (up to at least 1000 grit)
OK so lets go!
First a look at my unwashed plug and case that I haven't washed since I had my accident back in sept.
Grossness


First remove any rubber o-rings or anything that doesn't like heat

Next I'm going to sand off all the gunk and scratches starting at a low grit paper and working my way up to a 2000 grit paper. I kept a clockwise wet sanding motion to try and keep consistent when sanding.


Once your sanding is complete you can move on to the polishing process, if you buy a cheap polishing kit the instructions will tell you how to get the desired look you want. Basically you start off with a polishing compound on a tight stitched wheel and move your way up to a fine compound on a lose stitched wheel. I use a drill to spin the polishing wheels.

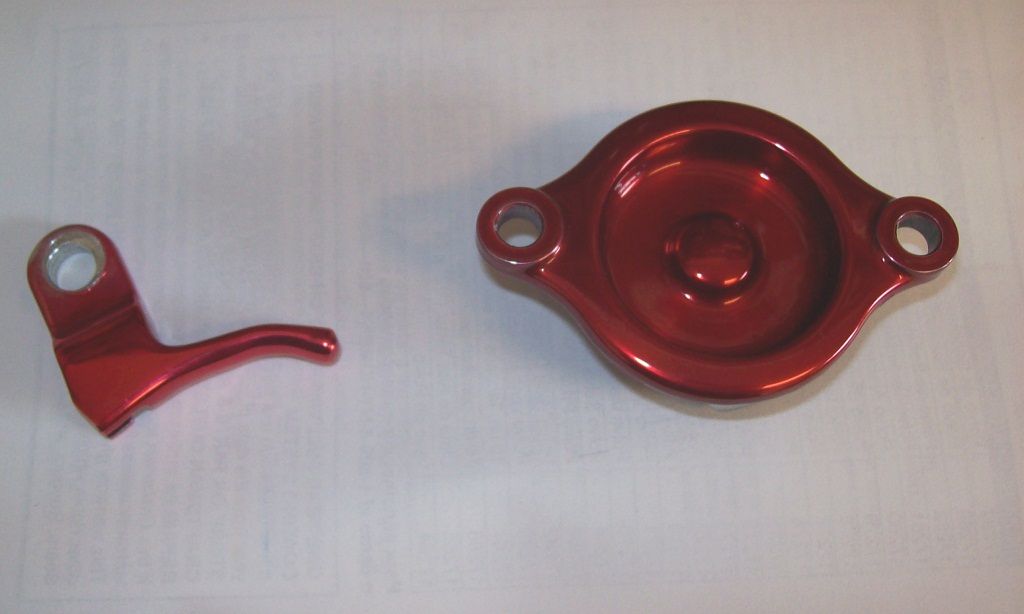
Once your done polishing you should have something shiny like this

Now its time to add the powder coating to give your part some colour. Im using a transparent powder because I nice shiny red plug. If you wanted flat black or something similar you can skip the polish stage and just sand, clean and coat. The powder coating process is pretty simple, just clean your part with acetone or brake cleaner, electrically ground your part( you can put to part in the oven for a few mins so the powder adheres easier),shoot the powder on the part, and then bake for the correct cure time of the powder your using ( the cure time starts at the point when the part reaches the desired temperature).
Once the part has cured your done, just let the part cool replace any O-rings and reinstall.


Figured I would try and give back to the community with a little powder coating tutorial. So my engine plugs were a bit messed up and ugly stock
Tool List
- Allen wrench to remove plugs
- Metal Polishing Kit (for aluminium)
- Drill or rotary tool to power a polishing kit wheel
- Powder coater( I use a craftsmen kit I got for like 30 bucks + ship on ebay)
- IR temp gun
- toaster oven (one your not gonna be using for cooking anymore)
- Sandpaper (up to at least 1000 grit)
OK so lets go!
First a look at my unwashed plug and case that I haven't washed since I had my accident back in sept.
Grossness
First remove any rubber o-rings or anything that doesn't like heat
Next I'm going to sand off all the gunk and scratches starting at a low grit paper and working my way up to a 2000 grit paper. I kept a clockwise wet sanding motion to try and keep consistent when sanding.
Once your sanding is complete you can move on to the polishing process, if you buy a cheap polishing kit the instructions will tell you how to get the desired look you want. Basically you start off with a polishing compound on a tight stitched wheel and move your way up to a fine compound on a lose stitched wheel. I use a drill to spin the polishing wheels.
Once your done polishing you should have something shiny like this
Now its time to add the powder coating to give your part some colour. Im using a transparent powder because I nice shiny red plug. If you wanted flat black or something similar you can skip the polish stage and just sand, clean and coat. The powder coating process is pretty simple, just clean your part with acetone or brake cleaner, electrically ground your part( you can put to part in the oven for a few mins so the powder adheres easier),shoot the powder on the part, and then bake for the correct cure time of the powder your using ( the cure time starts at the point when the part reaches the desired temperature).
Once the part has cured your done, just let the part cool replace any O-rings and reinstall.